Contours & highlights – professional makeup technique
3 min reading time
3 min reading time
Learn step by step how professionals contour and highlight . Discover techniques, products and tips for a perfectly defined face.
The art of contouring and highlighting – professional techniques explained
Contouring and highlighting aren't just trends – they're artistic techniques that shape your face with light and shadow.
Whether you want to subtly shape or create real dimension like in a photoshoot, the secret is in balance, texture and blending .
The makeup experts at Diana Beauty & PRO HAAR explain step by step how professionals apply these techniques.
1. What is contouring and why do we do it?
Contouring means shading certain parts of the face to define structure.
✔ Reduce or deepen dark tones (jawline, temples, nose).
✔ Accentuate light shades (cheekbones, bridge of the nose, chin).
Together they create optical balance and depth.
PRO TIP: Contouring isn't about color, it's about shadow—always choose a cool brown shade, not an orange bronzer.
2. Choosing the right products
✔ Cream products: ideal for natural, soft transitions.
✔ Powders: perfect for oily skin or a matte finish.
✔ Sticks or palettes: easy to dose and blend.
Expert advice: Choose 2 shades darker than your skin tone for contour, and 1 shade lighter for highlight.
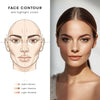
3. Step-by-step contour technique
✔ Apply contour under the cheekbone – not on it.
✔ Sweep lightly along the hairline and jawline.
✔ For nose: use a thin brush and draw a subtle line along the sides.
✔ Blend upwards for a lifting effect.
PRO TIP: Use a sponge or brush in circular motions for smooth transitions without streaks.
4. Highlighting – the play of light
Highlighting is the opposite of contour: it captures light.
✔ Apply above cheekbones, on bridge of nose, cupid's bow and chin.
✔ Use liquid or cream highlighters with fine pigments.
✔ Avoid glitter – choose a soft radiance .
Expert advice: Highlight only the areas you want to accentuate, not the entire face – less is more.
5. Face shapes & personalization
Each facial shape requires different accents.
✔ Oval: maintain balance, light contour under cheekbone.
✔ Round: Focus on cheekbones and temples for a slimmer effect.
✔ Long: contour on forehead and chin to shorten.
✔ Square: Softens angles by blending around the jaw and temples.
✔ Heart-shaped: highlight chin and cheekbones, contour around temples.
PRO HAIR advice: Contouring is a custom job – observe first, shape later.
6. Fix without weighing down
✔ Use transparent powder only on the T-zone.
✔ Then spray a hydrating fixing mist for a natural result.
✔ For a long-lasting effect: layering – thin layers instead of one thick layer.
7. Common mistakes
❌ Too dark shades – give a patchy effect.
❌ Poor lighting during application.
❌ No blending towards the hairline.
❌ Too much shimmer highlighter – makes it greasy instead of shiny.
Solution: Practice in natural light, use small amounts, and blend until product disappears into skin.
Conclusion: contouring is sculpture, not a mask
The secret to a professional result is control, precision and mastery of light.
Good contouring doesn't change who you are – it enhances your natural features.


